MTB Tire Pressure Guide: Chart, Calculator, and Pro Setup
When I first started riding mountain bikes, I never gave much thought to tire pressure. I’d grab my pump, hit a few strokes until the tire felt “firm enough,” and roll out the door. Sometimes the bike felt like it was glued to the ground with grip for days, and other times it felt like I was riding on bowling balls—slipping in corners, bouncing off roots, and even denting a rim or two. It took me a long time (and more than a few flats) to realize that the difference wasn’t the bike, or the trail, or even my skill level—it was tire pressure.
Dialing in PSI is one of the cheapest and most impactful upgrades you can make to your ride. The right pressure means better traction on loose climbs, smoother handling in rock gardens, fewer pinch flats, and that magic “planted” feeling in corners. The wrong pressure, on the other hand, can make a $5,000 bike feel like a clunky hardtail from the ’90s.
I built this chart and simple calculator so riders like you don’t have to guess. Instead of endless trial and error, you can start with a proven baseline based on your weight, tire width, terrain, and casing, then fine-tune for your local trails. Think of it as a shortcut to unlocking your bike’s full potential—without the frustration of mid-ride flats or sketchy handling.
So whether you’re a trail rider chasing flowy singletrack, an enduro racer pushing through chunky descents, or an eMTB rider hauling extra weight, this guide will give you the numbers, steps, and pro tips you need to set your tires right every single ride.
Why tire pressure matters
- Grip: Lower PSI = bigger contact patch = more traction.
- Rolling speed: Too soft wastes energy; too hard skips over bumps.
- Puncture protection: Right PSI minimizes pinch flats and rim strikes.
- Ride feel: Pressure is the cheapest suspension upgrade you can make.
Variables that change PSI
- Rider system weight (you + pack + water)
- Tire width (2.3 vs 2.6 makes a big difference)
- Casing & inserts (EXO/DD/DoubleDown, Super Trail, CushCore, etc.)
- Terrain (loam vs sharp rock)
- Tubeless vs tubes (tubes usually +2–3 PSI)
- Rim internal width (wider rim supports lower PSI)
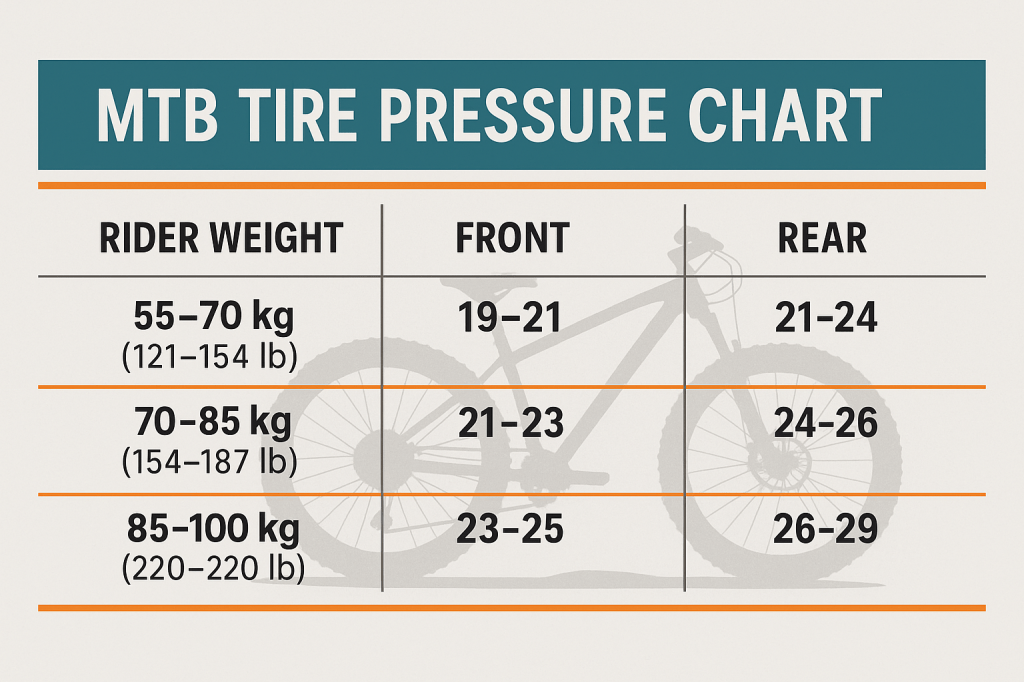
Quick-Start PSI Chart (Tubeless, modern 30 mm rims, trail casing)
| Rider System Weight | 2.3–2.4″ Tires | 2.5–2.6″ Tires |
|---|---|---|
| 55–70 kg (121–154 lb) | F 19–21 / R 21–24 | F 18–20 / R 20–22 |
| 70–85 kg (154–187 lb) | F 21–23 / R 24–26 | F 20–22 / R 22–24 |
| 85–100 kg (187–220 lb) | F 23–25 / R 26–29 | F 22–24 / R 24–27 |
| 100–115 kg (220–254 lb) | F 25–27 / R 29–32 | F 24–26 / R 27–30 |
Add or subtract based on:
Narrow rims (<27 mm): +1 PSI
Aggressive rocky terrain: +1–3 PSI
Reinforced casing (DD/SG): –1–2 PSI feasible
Tire inserts: –1–2 PSI feasible
Tubes: +2–3 PSI
One-Minute PSI Calculator
MTB Tire Pressure Calculator
Rider system weight (kg):Tire width: 2.3–2.4″ 2.5–2.6″
Terrain: Mixed/Typical Rocky/Aggressive Soft/Loam
Casing: Trail/EXO Reinforced/DD
Inserts: No Yes
Calculate
Step-by-step: Dial in your pressure
- Seat tubeless perfectly (fresh sealant, shake and roll).
- Start at calculator PSI.
- Sag test in a parking lot: Roll off a curb standing. If you feel rim ping, +1–2 PSI rear.
- Cornering test: On a safe berm, if sidewall burps or feels vague, +1 PSI front.
- Grippy climb test: If rear slips on roots, –1 PSI rear.
- Temperature check: Cold mornings lower PSI; recheck before the ride.
- Log your local settings for dry vs wet days.
eMTB & Downhill notes
- eMTB: Heavier system weight = +1–3 PSI versus analog setups. Inserts highly recommended for rocky parks.
- Downhill: Reinforced casings and inserts allow lower PSI (often F 21–24 / R 24–28 for 2.5″ tires, rider-dependent).
Common mistakes (and easy fixes)
- Using a floor pump gauge only: Get a digital pressure gauge for ±0.5 PSI accuracy.
- Ignoring rim width: Narrow rims need a touch more PSI.
- Never adjusting for conditions: Wet roots? Drop 1 PSI front and rear.
- Too soft without inserts: Consider tire inserts if you want more grip with fewer rim strikes.
Recommended gear
- Digital tire pressure gauge
- High-volume MTB floor pump
- Tubeless sealant (race formula for rocks)
- Rim tape + tubeless valves kit
- Tire inserts (trail/enduro pair)
- CO₂ inflator + cartridges
FAQs
What PSI for a 2.6″ tire?
Most riders land around 20–24 PSI front and 22–27 PSI rear, then tweak for weight and terrain.
Do I need higher PSI with tubes?
Yes—add 2–3 PSI to reduce pinch flats.
Should front and rear match?
Usually rear is 1–3 PSI higher because it carries more load and hits square edges harder.
How often should I check pressure?
Before every ride. Temperature changes and small sealant leaks add up.
Are inserts worth it?
For rocky trails or heavier riders: often yes. They let you run 1–2 PSI lower with better rim protection.
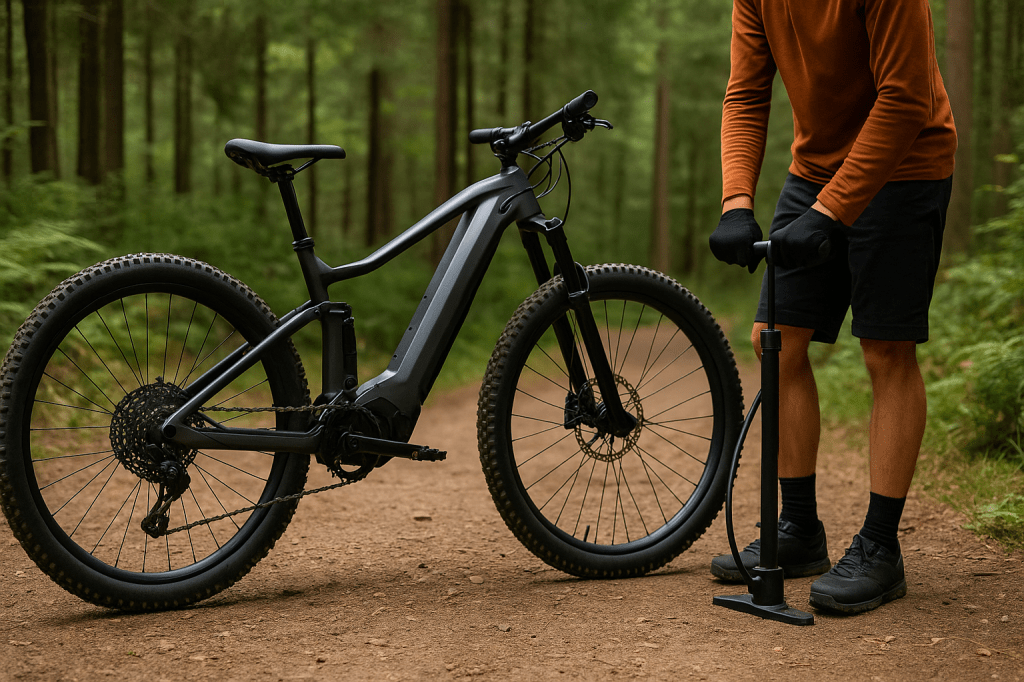
Pump Up Your Ride
If there’s one thing mountain biking has taught me, it’s that the little details often make the biggest difference. Tire pressure doesn’t cost you a cent, but it can completely change the way your bike feels on the trail. I’ve gone from sketchy, rim-smashing descents to smooth, controlled rides simply by dialing in a couple of PSI. It’s a small adjustment with huge payoffs—more grip, fewer flats, and a bike that feels like it’s working with you instead of against you.
The best part? You don’t need to be a pro mechanic to get it right. Start with the chart or calculator above, do a quick parking lot test, and make a few tweaks on your favorite loop. Keep a note in your phone of what works for different trails or weather conditions. Pretty soon, you’ll have your “magic numbers” that make your bike feel perfect every single time you roll out.
So before you splurge on new carbon wheels or that next suspension upgrade, grab a good digital gauge and spend a few rides experimenting with tire pressure. You’ll be surprised how much faster, smoother, and more confident you feel—without opening your wallet.
Now it’s your turn: check your PSI, take it to the trail, and let your tires do the work. Your bike (and your rims) will thank you.

Leave a comment